Fox and Hedgehog by Jane McGinley

Thursday, 14 February 2013

Carnival Cookies

For Mardi Gras / Shrove Tuesday, I prepared these amazing Carnival Cookies and why the hell not! It's all about being the last night of eating richer foods before Lent isn't it? But actually if the truth be told, these little bundles of delight aren't all that bad, in fact they're butterless, flourless, eggless and virtually sugarless, all thanks to Heidi Swanson of 101 Cookbooks! That just meant we had to make up for really letting our hair down in another way... Hastings Fat Tuesday!

If you're interested in making your own Carnival Cookies you will need;

3 large ripe bananas, well mashed up
1 teaspoon vanilla extract
60ml extra-virgin coconut oil, warmed (not solid)
120g rolled oats
60g ground almonds
1 teaspoon baking powder
1/2 teaspoon ground cinnamon
1/2 teaspoon salt
100g shelled peanuts
170g dark chocolate, chopped up
20g popped corn

Preheat the oven to 180C with racks in the top and bottom thirds. Line two baking sheets with parchment.
In a large bowl combine the bananas, vanilla and coconut oil. In another bowl, whisk together the oats, ground almonds, baking powder, cinnamon and salt.  
 

Add dry ingredients to wet ingredients and stir until combined. Fold in the chopped chocolate, then the peanuts and lastly the popped corn. 


Firmly shape into balls with your hands, about 1 heaped tablespoon in each, and place on the baking sheets about 1 inch apart.
Bake for 14-17 minutes, swapping the baking sheets from top to bottom once along the way, until the bottoms are deeply golden. Remove from the oven and allow the cookies to cool on a wire rack. 


Wow! These really are like a carnival on the tip of your tongue! They are delicious eaten warm when the chocolate is all soft and gooey. Mmm mmm.

Sunday, 3 February 2013

Baked Eggs

When you fancy something a bit different to the usual boiled/poached/fried egg on toast, I recommend you try baked eggs! Simple to rustle up and very tasty; perfect for a Saturday or Sunday breakfast or brunch.

Serves 2


- Knob of butter

- 2 eggs

- 2 handfuls of grated cheese
- Nutmeg
- Salt and pepper
- Spinach, cooked and drained (cooked mushrooms would also work very nicely)

Here's how:

- Preheat the oven to 180C.
- Smear some butter in two ramekins. Layer in your spinach (and/or mushrooms) and a little grated nutmeg.

- Crack an egg over the top, followed by grated cheese, salt and pepper.
- Place your ramekins in a deep baking dish and fill the dish with enough water to come halfway up the sides of the ramekins.
- Bake in the oven for about 15 minutes or until the egg yolks are to your liking. 


Sit down and enjoy.

Saturday, 2 February 2013

Découpage

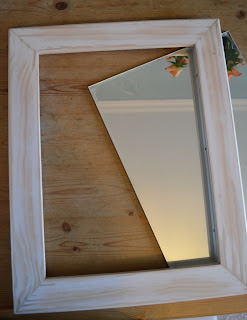
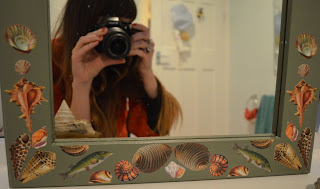
A rather bland mirror came with us in the move to Hastings and I had just stuck it out in the shed until I had an idea of how I could jazz it up. I came across these cool découpage sheets of sea shells and creatures and thought they'd be perfect for the job. I also bought a small sample pot of Marston & Langinger, Grey Green for the background colour of the frame.

Here's how you too can jazz up any of your dull items of furniture...

You will need; 
- Your object you wish to decorate 
- A tin of paint in a colour of your choice
- Découpage sheets of your preferred design or magazine clippings, cut out to size
- Découpage glue (I used an exterior quality découpage varnish because my mirror will be hung in the bathroom and I needed to make sure it would be waterproof). PVA glue will also work fine
- Scissors or craft knife
- Paintbrush(es)
- Sheet of sandpaper

Step 1: If you have chosen to paint the base of your object, you may need to give it a rub over first with some sandpaper to smooth out any lumps and bumps and lift off any surface dirt or grease to ensure the paint takes to it. Be sure to thoroughly clean off any dust left behind.


Step 2: Apply a coat of paint to the base of your object. My frame needed a total of 3 coats to achieve a nice even solid colour. Allow to dry between each coat of paint according to the instructions on the tin. 


Step 3: Once the base colour is dry, you're ready to start layering on your paper cut outs. Arrange your cut outs on your object until you're happy with the design, it took me a while to decide on how I wanted to place mine, take your time with this step; move them around and try out different designs, don't be afraid to experiment. 


Step 4: Now you've decided on the final composition, you're ready to start gluing down. Apply a little glue to the back of each cut out (take care not to apply too much as this could make thin paper wrinkle). Gently smooth down each piece. 

  
Step 5: When all your pieces are glued down in place, you will now need to apply a coat of the découpage varnish or PVA over the whole surface of your object. Don't worry if it looks white, it will dry clear! Allow to dry completely at room temperature, usually about 4 hours, and repeat this step. 

And there you have it, your unique piece of jazzed up furniture to enjoy!